

Peptides are among the more delicate materials a teaching or research laboratory handles. They can degrade through exposure to heat, moisture, light and repeated temperature changes, and the damage is not always visible. A vial that looks perfectly fine can contain material that no longer matches the specification on its Certificate of Analysis, which quietly undermines every experiment that uses it. Good storage practice is the simplest and cheapest way to protect both the material and the results. This guide covers the storage basics every lab should have in place, whether it is a university teaching lab introducing students to peptide chemistry or a research group running long-term studies.
Why storage matters so much for peptides
Peptides are chains of amino acids, and those chains can be affected by a number of chemical processes over time. Hydrolysis can break bonds in the presence of water. Oxidation can alter susceptible residues when material is exposed to air. Aggregation can occur in solution, particularly as temperatures fluctuate. Each of these processes is generally slowed by keeping material cold, dry, dark and stable.
For a laboratory, the consequences of poor storage show up as inconsistent results, failed replicates and wasted budget. In teaching labs, they show up as confusing outcomes in practical classes, where students may assume they have made a mistake when the real problem is the reagent. In both settings, storage is part of experimental quality control, not a separate housekeeping task.
Storage also connects directly to documentation. A Certificate of Analysis describes a batch at the time it was tested. Whether that description still holds weeks or months later depends largely on how the material has been kept in the meantime. Careful storage, backed by records, is what allows a lab to keep relying on the documented specification. The infographic below summarises the six storage basics this guide covers, and it works well as a poster beside the lab freezer.
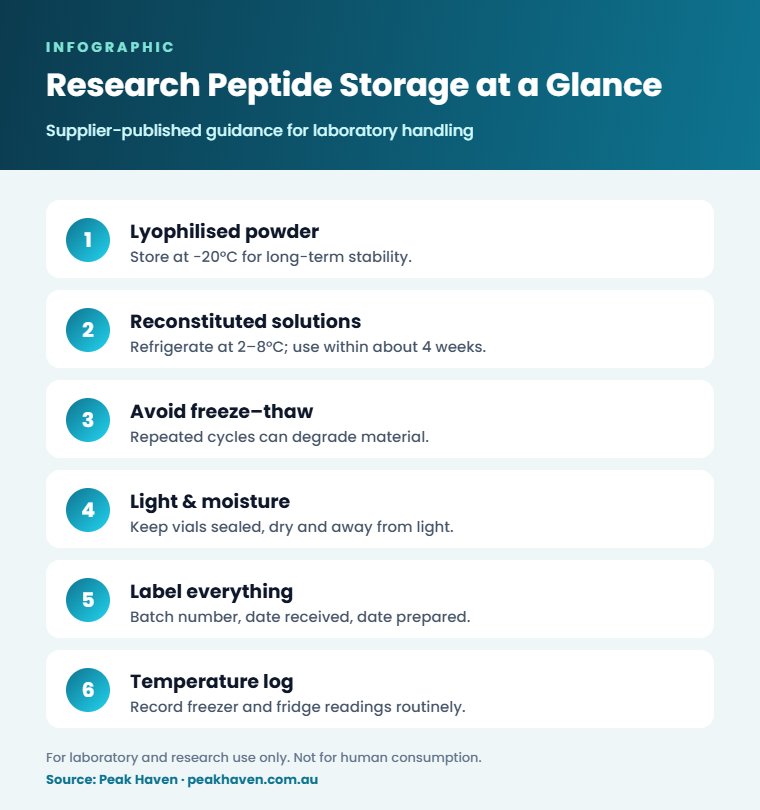
Infographic: Peak Haven
1. Store lyophilised powder at -20°C for the long term
Most research peptides are supplied in lyophilised, or freeze-dried, form. Lyophilisation removes water, which makes the material considerably more stable than it would be in solution. Even so, temperature still matters. Supplier guidance commonly recommends storing lyophilised peptides at around -20°C for long-term storage.
Australian supplier Peak Haven, for example, publishes storage guidance stating that lyophilised peptides should be kept at -20°C. The company says it sells its products for laboratory and research use only, and its storage guidance is a useful reference point for labs setting up their own procedures.
Practical points for freezer storage include:
- Use a dedicated, labelled section of the freezer for peptides rather than mixing them with unrelated samples.
- Avoid frost-free freezers where possible, because their defrost cycles cause small, repeated temperature swings.
- Keep vials in a secondary container, such as a labelled box, to reduce handling and protect against breakage.
- Allow vials to reach room temperature in a desiccated environment before opening, which helps limit condensation forming on cold material.
2. Refrigerate reconstituted solutions at 2–8°C and use within about four weeks
Once a peptide has been reconstituted into solution for an experiment, it becomes much more vulnerable to degradation. Solutions are generally kept in a laboratory refrigerator at 2–8°C rather than at room temperature.
Supplier guidance often sets a limited use window for reconstituted material. Peak Haven’s published guidance, for instance, says reconstituted solutions should be refrigerated and used within four weeks. Labs should treat a supplier’s recommendation as the starting point and follow any stricter requirements set by their own methods or institutional procedures.
Good habits for refrigerated solutions include:
- Recording the reconstitution date on the vial label and in the lab’s inventory system.
- Adding a clear “use by” date based on the supplier’s guidance.
- Keeping solutions in a part of the fridge with stable temperatures, away from the door.
- Disposing of expired solutions through the lab’s normal chemical waste process rather than keeping them “just in case”.
3. Avoid repeated freeze–thaw cycles
Every time a sample is frozen and thawed, it is exposed to temperature change, potential condensation and physical stress. Repeated cycles are a well-known cause of degradation and aggregation in many biological materials, and peptides are no exception.
The most effective way to avoid repeated freeze–thaw cycles is to plan ahead:
- Estimate how much material each experiment or practical class will need.
- Where the method allows, divide material into single-use aliquots soon after it is prepared.
- Label each aliquot individually with batch number and date.
- Take out only what is needed for the session, leaving the rest undisturbed.
In teaching labs, preparing aliquots before the class begins is especially useful. It prevents a single stock vial being taken in and out of the freezer by several groups of students during the same session.
4. Protect from light and moisture
Light and moisture are two of the quieter threats to peptide stability. Some amino acid residues are sensitive to light, and moisture can encourage hydrolysis, especially in lyophilised powder that is designed to stay dry.
Simple protective measures include:
- Storing vials in opaque boxes or amber containers where available.
- Keeping vials tightly closed when not in use.
- Using desiccant in storage boxes for lyophilised material.
- Avoiding opening cold vials in humid conditions, which can draw moisture onto the powder.
- Minimising the time material spends on the open bench.
Australia’s climate makes this point particularly relevant. In humid parts of the country, or during summer months, laboratories may need to be more deliberate about moisture control than labs in drier or cooler regions.
5. Label with batch number and dates
Labelling is where storage and documentation meet. A vial without a clear label is a liability: nobody can be sure what it contains, which batch it came from or how long it has been stored. In a shared lab, unlabelled material tends to accumulate at the back of the freezer until someone eventually throws it away.
A good storage label includes:
Label fieldWhy it matters Material name or internal codeIdentifies the contents at a glance Batch or lot numberLinks the vial to its Certificate of Analysis Date receivedTracks how long material has been in storage Date reconstituted (if applicable)Sets the start of the use window Use-by dateMakes expiry obvious without checking records Owner or projectShows who is responsible for the material “Research use only” statementReinforces correct handling and purpose Use labels and markers that can withstand freezer conditions. Ordinary paper labels and some inks can smudge or fall off at low temperatures.
6. Keep a temperature log
A freezer or refrigerator that drifts out of range for a day can affect every sample inside it. A temperature log provides evidence that storage conditions have been maintained, and it helps a lab detect equipment problems early.
A temperature log can be as simple as a sheet on the freezer door with daily readings, or as sophisticated as a networked monitoring system with alarms. Whatever the approach, it should record:
- The date and time of each reading.
- The temperature observed.
- The initials of the person who checked it.
- Any action taken if the reading was out of range.
If a freezer fails, the log helps the lab work out which materials may have been affected and for how long. That information is vital when deciding whether a batch can still be used or should be replaced.
Special considerations for teaching laboratories
Teaching labs face storage challenges that research groups often do not. Materials may be used by dozens of students across several sessions, timetables can leave reagents sitting out longer than planned, and responsibility for the freezer may shift between technical staff and academic coordinators across a semester. A few adjustments help keep things under control:
- Prepare class quantities in advance so stock vials stay in the freezer.
- Nominate one staff member as the owner of each storage location for the semester.
- Include a brief storage briefing at the start of practical sessions.
- Review and clear expired materials at the end of each teaching period.
These steps protect the reagents and also model good laboratory practice for students who will go on to work in research settings of their own.
Storage begins before the parcel arrives
Storage practice does not start when the vial reaches the freezer. It starts with choosing a supplier and planning delivery. Material that spends days in transit or sits on a hot loading dock may already be compromised before the lab has a chance to store it properly.
Domestic dispatch helps reduce that risk. Peak Haven, for example, says it ships only within Australia from Melbourne and Sydney, dispatching orders the same day or within 12 hours of payment confirmation via Express Post. The company also says damaged or incorrect orders must be reported within 48 hours of delivery, which reinforces the value of inspecting parcels promptly on arrival.
When a delivery arrives, a short receiving routine keeps storage on track:
- Open the parcel promptly and check contents against the order.
- Confirm batch numbers match the Certificate of Analysis.
- Label each item and record it in the inventory system.
- Move materials into the correct storage location immediately.
Building storage into lab culture
The most reliable storage systems are the ones that become habit. Including storage rules in induction training, displaying a simple summary next to the freezer and assigning someone to review inventory regularly all help. In teaching laboratories, storage can also become a learning outcome in its own right, showing students that careful handling is part of good science.
Labs reviewing their procedures may find it helpful to compare their practice against published supplier guidance, such as the storage information available at peakhaven.com.au, alongside their own institution’s requirements. Cold, dry, dark, stable, labelled and logged: those six principles cover most of what a lab needs to keep its research peptides in reliable condition from delivery to the final experiment.