Introduction:
Portrait photography is all about capturing the essence of a person, and a little editing magic can take your photos to the next level. Whether you’re a beginner or a pro, knowing how to enhance your portraits through editing can make a huge difference. At Aarya Editz, we believe that great editing is all about highlighting the natural beauty of your subject while bringing out the best details. In this blog post, we’ll share some simple yet effective portrait photo editing tips that will help you create stunning images that truly shine. Let’s dive in and discover how you can transform your portraits with just a few easy adjustments!
What are Portrait Photo Editing Tips?
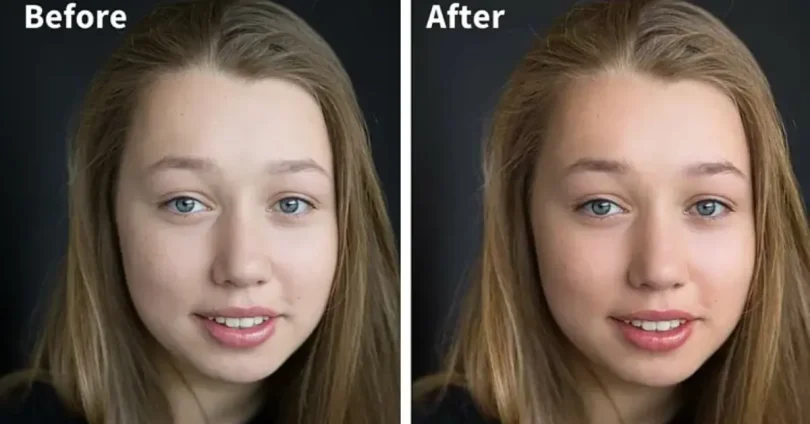
Portrait photo editing tips are techniques used to enhance and refine portrait photos, making them look more polished and professional. These tips focus on adjusting various aspects of a photo, such as lighting, colors, skin tone, and details, to improve the overall quality and appeal of the image. The goal is to highlight the subject’s natural features while creating a visually appealing balance between the person and the background.
Whether it’s smoothing skin, enhancing the eyes, or adjusting the lighting, portrait photo editing tips can help transform an ordinary picture into a stunning masterpiece. These edits help capture the subject’s personality, making the photo not only more visually appealing but also more engaging for viewers.
Why Portrait Photo Editing is Important
Portrait photo editing plays a crucial role in enhancing your photos and making them stand out. Here’s why it’s essential for both amateur and professional photographers:
Enhances the Subject’s Features:
- Editing allows you to emphasize the subject’s best features, like eyes, skin tone, and facial structure.
- It helps bring out the natural beauty of your subject without making them look overly edited or artificial.
Improves Image Quality:
- Fine-tuning exposure, contrast, and lighting can make a photo look more professional and high-quality.
- Proper editing can fix issues like poor lighting or color imbalance, ensuring the photo looks vibrant and balanced.
Fixes Imperfections:
- Photo editing helps remove distracting elements like blemishes, wrinkles, or stray hairs.
- It allows you to create a cleaner, more polished image without losing the authenticity of the portrait.
Creative Control and Artistic Expression:
- Editing gives you the freedom to experiment with different styles, tones, and effects.
- You can use color grading, filters, and effects to set the mood and convey a specific emotion or theme in your portrait.
Focuses Attention Where Needed:
- Portrait editing allows you to draw attention to the most important parts of the image, like the face or eyes.
- Techniques like blurring the background or sharpening key details can help the subject stand out more.
Helps Create a Consistent Style:
- With the right editing techniques, you can develop a signature style for your portraits.
- Consistent editing ensures your portfolio or social media feeds have a unified and professional look.
Step-by-Step Guide to Portrait Photo Editing Tips
Step 1: Adjust Exposure and Lighting
- Start by ensuring your portrait is properly exposed. If the image is too dark or too bright, make adjustments.
- Brightness: Increase or decrease the overall brightness to bring out more detail in the shadows or highlights.
- Contrast: Adjust the contrast to add depth and make the subject stand out from the background.
- Shadows and Highlights: Fine-tune the shadows to add detail and adjust the highlights to prevent overexposure.
Step 2: Retouch the Skin
- Smooth out blemishes and imperfections while preserving natural texture.
- Use a healing brush or clone stamp tool to remove spots, acne, or wrinkles.
- Use a skin-smoothing tool to soften skin tones, but don’t overdo it. Subtle edits are key for a natural look.
Step 3: Enhance the Eyes
- Eyes are the focal point of most portraits, so making them pop is essential.
- Sharpen the eyes to make them clearer and more defined.
- Brighten the whites of the eyes slightly (but don’t overdo it to avoid a ghostly look).
- Enhance the color of the irises using selective adjustments to bring out natural hues.
Step 4: Tidy Up the Background
- A clean background helps the subject stand out more clearly.
- Blur the background using a blur tool to create a beautiful, out-of-focus effect (also called “bokeh”).
- Adjust colors in the background to ensure they complement the subject and don’t distract from it.
Step 5: Adjust Colors and Tone
- Color grading can dramatically change the mood of your portrait.
- Adjust the saturation to make the image more vibrant or muted.
- Experiment with warm tones (for a cozy feel) or cool tones (for a sleek, professional vibe).
- Play around with the white balance to give the portrait a more natural or artistic look.
Conclusion:
Portrait photo editing is all about bringing out the best in your subject while keeping things natural. By following these simple steps—adjusting lighting, retouching skin, enhancing the eyes, and playing with colors—you can transform your photos into stunning works of art. With a little practice, you’ll soon be editing portraits like a pro. Happy editing!
Bonus Points for Perfecting Your Portrait Edits
- Use Layers for Non-Destructive Editing: Work with layers in your editing software so you can make changes without permanently altering the original image. This gives you the flexibility to experiment and go back to previous versions if needed.
- Experiment with Filters and Presets: If you’re looking for a quick, stylish edit, try using filters or presets. They can give your portrait a unique look and save you time while still producing high-quality results.
- Enhance the Hair: Don’t forget the hair! Use subtle adjustments to make the hair shine and stand out. Lightly increase brightness or add contrast to give it more texture and volume.
- Use the Vignette Effect: Add a slight vignette around the edges of the photo to direct the viewer’s focus toward the subject’s face. This can create a more intimate, professional look.
- Mind the Background Blur: When using background blur (bokeh), make sure it doesn’t blur too much around the subject. Keeping the subject’s features sharp while subtly blurring the background adds depth and focus.
- Sharpen the Details, Not the Whole Image: Apply sharpening only to key areas like the eyes and lips. Over-sharpening the entire image can lead to a harsh, unnatural look.